You filed your ITR (Income Tax Return). And You got the acknowledgement number. You closed the tab and told yourself — done.
But you are not done. Not until you e-verify.
Filing your income tax return is only half the job. Until you e-verify it, the Income Tax Department does not consider your return as filed. No processing happens, no refund is issued, and no acknowledgement is generated. Your ITR is essentially sitting in limbo — submitted but invisible to the system.
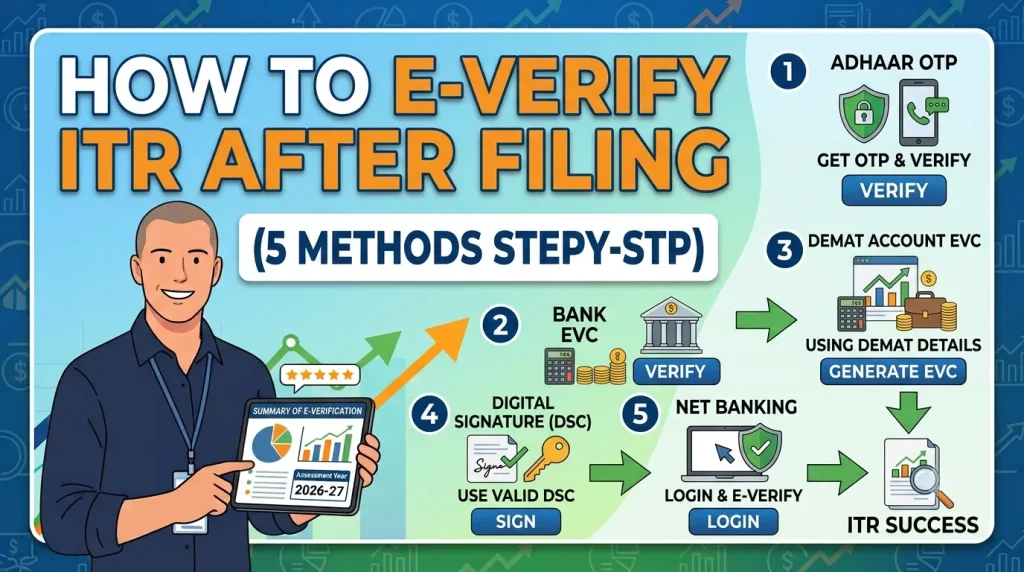
Every year, thousands of taxpayers wait for their refund and wonder why it has not arrived — only to realize their return was never processed because they skipped e-verification. This article will walk you through How to E-Verify ITR After Filing – 5 methods to e-verify your ITR step by step, tell you exactly how much time you have, and explain what happens if you miss the deadline.
Need Help in Calculating your Income Tax? Download the Income Tax Excel Calculator here:
- Is E-Verification Mandatory for ITR?
- What is the Time Limit for E-Verification of ITR?
- Quick Comparison of All 5 E-Verification Methods
- How to E-Verify ITR – Getting Started
- Method 1 – E-Verify Using Aadhaar OTP (Fastest – Recommended)
- Method 2 – E-Verify Using Net Banking (No Pre-Validation Needed)
- Method 3 – E-Verify Using Bank Account EVC
- Method 4 – E-Verify Using Demat Account EVC
- Method 5 – Physical ITR-V Sent by Post (Offline Method)
- What Happens After Successful E-Verification?
- Is There a Penalty for Late E-Verification?
- Frequently Asked Questions on ITR E-Verification
- Conclusion
Is E-Verification Mandatory for ITR?
Yes — absolutely. Without verification within the stipulated time, an ITR is treated as invalid.
There is no exception to this. Even if you have filed a perfect return with zero errors, without e-verification it is treated as if you never filed at all. This means:
- No refund will be processed
- You will be treated as a non-filer by the Income Tax Department
- Consequences of not filing — late fees, interest, and notices — will apply
- You lose the right to carry forward capital losses
E-verify immediately after filing. Do not wait.
ALSO READ: How to File Income Tax Return (ITR) Online
What is the Time Limit for E-Verification of ITR?
The time limit for ITR verification online is 30 days from submitting the ITR as per the new rule. Previously, this time limit was 120 days. This new rule is applicable for returns filed on or after 1st August 2022.
So for AY 2026-27 — if you file your ITR on July 25, 2026, you have until August 24, 2026 to e-verify. But there is genuinely no reason to wait. Every method below takes under 5 minutes. E-verify the moment you submit your return.
Quick Comparison of All 5 E-Verification Methods
| Method | Time Taken | Pre-condition Required | Best For |
|---|---|---|---|
| Aadhaar OTP | Under 2 minutes | Aadhaar linked to PAN + registered mobile | All salaried employees — fastest option |
| Net Banking | 3–5 minutes | Active net banking with authorised bank | If Aadhaar mobile is not registered |
| Bank Account EVC | 3–5 minutes | Pre-validated + EVC enabled bank account | Those with pre-validated account on portal |
| Demat Account EVC | 3–5 minutes | Pre-validated + EVC enabled demat account | Stock market investors |
| Physical ITR-V | 7–15 days (transit) | Printer + Speed Post access | Last resort only |
How to E-Verify ITR – Getting Started
All e-verification methods start from the same place on the income tax portal:
- Log in to incometax.gov.in
- Select Income Tax Returns → e-Verify Return
- The portal will show your submitted but unverified returns
- Click e-Verify next to the relevant AY 2026-27 return
- Choose your preferred verification method from the options shown
Now let me walk you through each method.
Method 1 – E-Verify Using Aadhaar OTP (Fastest – Recommended)
This is the simplest and fastest method. Most salaried individuals should use this.
Pre-condition: Your Aadhaar must be linked to your PAN, and your mobile number must be registered with Aadhaar (the number on which you receive Aadhaar OTP).
Steps:
- Step 1 — After clicking e-Verify, select “I would like to e-verify using OTP on mobile number registered with Aadhaar”
- Step 2 — Check the box that says “I agree to validate my Aadhaar Details” and click Generate Aadhaar OTP
- Step 3 — A 6-digit OTP will be sent to your Aadhaar-registered mobile number. It is valid for 15 minutes
- Step 4 — Enter the OTP on the portal and click Validate
- Step 5 — A success message appears with a Transaction ID. Save this — it is your e-verification proof
Total time: under 2 minutes. This is the method I recommend for all salaried taxpayers.
ITR 2 Filing with STCG Examples VIDEO

Watch more Videos on YouTube Channel
Method 2 – E-Verify Using Net Banking (No Pre-Validation Needed)
If your Aadhaar is not linked to your mobile number, net banking is the next best option. Authorized banks provide EVC (Electronic Verification Code) through their net banking portals as well.
Pre-condition: You must have active net banking with a bank that is authorized by the Income Tax Department for e-verification. Most major banks including SBI, HDFC, ICICI, Axis, Kotak, and others are on the list.
Steps:
- Step 1 — On the e-Verify page, select “Through Net Banking” and click Continue
- Step 3 — You will be redirected to your bank’s net banking login page
- Step 4 — Log in to your Net Banking using your Net Banking user ID and password. Click the link to log in to e-Filing from your bank’s website.
- Step 5 — You will be automatically redirected back to the income tax portal, logged in
- Step 7 — A success message appears with a Transaction ID
After logging in through net banking and clicking e-Verify, a success message will appear with a Transaction ID. Save this ID for future reference.
ALSO READ: Old Tax Regime v New Tax Regime Comparison
Method 3 – E-Verify Using Bank Account EVC
This method generates an Electronic Verification Code (EVC) through your pre-validated bank account linked to the income tax portal.
Pre-condition: Your bank account must be pre-validated on the income tax portal and marked as EVC-enabled. To check — log in to the portal, go to My Profile → Bank Account and verify your account status shows “Validated and EVC Enabled.”
Steps:
- Step 1 — On the e-Verify page, select “Through Bank Account” and click Continue
- Step 2 — Select the bank account you want to use
- Step 3 — Click Generate EVC — a 10-digit EVC code is sent to your registered mobile number and email
- Step 4 — Enter the EVC on the portal and click e-Verify
- Step 5 — Success message with Transaction ID appears
If my bank account is inactive, I cannot e-verify my return using it. I need to have an active bank account that is pre-validated and EVC-enabled on the e-filing portal. If your bank account is not pre-validated, go to My Profile on the portal and add your bank account first.
Method 4 – E-Verify Using Demat Account EVC
If you have a demat account with CDSL or NSDL, you can use it to generate an EVC for verification.
Pre-condition: Your demat account must be pre-validated on the income tax portal and EVC-enabled. Check this under My Profile → Demat Account on the portal.
Steps:
- Step 1 — On the e-Verify page, select “Through Demat Account” and click Continue
- Step 2 — Select your demat account (CDSL or NSDL)
- Step 3 — Click Generate EVC — the code is sent to your mobile number and email registered with your demat account
- Step 5 — Confirmation message with Transaction ID appears
This method is particularly convenient for stock market investors who already have an active, pre-validated demat account on the portal.
ALSO READ: How to Download AIS and Form 26AS
Method 5 – Physical ITR-V Sent by Post (Offline Method)
This is not e-verification — it is the offline alternative for those who cannot use any of the digital methods above.
If electronic verification methods do not suit you, you may download the return filing acknowledgement — ITR-V — and send the same via post after signing it. You must do it, or anyone authorized by you through a valid power of attorney.
Steps:
- Step 1 — After filing your ITR, download the ITR-V (Acknowledgement) from the portal — go to e-File → Income Tax Returns → View Filed Returns → Download ITR-V
- Step 2 — Print the ITR-V
- Step 3 — Sign it in blue ink
- Step 4 — Send it by Speed Post (ordinary post is also accepted) to: CPC, Post Box No. 1, Electronic City Post Office, Bengaluru – 560100, Karnataka
- Step 5 — Keep the postal receipt as proof
Important points for the physical method:
- The ITR-V must reach the CPC within 30 days of your filing date
- Do not fold or staple the ITR-V — send it flat if possible
- No covering letter is needed — just the signed ITR-V
- Processing only starts after CPC receives and accepts the physical copy, which can take several weeks
Use this method only as a last resort. All four digital methods above are instant and far more reliable.
What Happens After Successful E-Verification?
Once you e-verify by any method:
- The portal shows a success confirmation page with a Transaction ID — save or screenshot this
- A confirmation email and SMS are sent to your registered mobile number and email
- The Income Tax Department begins processing your return
- If a refund is due, it is credited to your pre-validated bank account, typically within 20 to 45 days of processing, though timelines vary
- You can track your refund status on the portal under e-File → Income Tax Returns → View Filed Returns
ALSO READ: What is Form 16 in Income Tax Return and How to Download
Is There a Penalty for Late E-Verification?
If you fail to verify your return on time, it will be considered as if you have not filed your return, resulting in the consequences associated with not filing a return.
This means:
- Late filing penalty under Section 234F (Rs. 1,000 or Rs. 5,000 depending on income) applies
- Interest under Section 234A on any unpaid tax liability applies from the original due date
- Refund due to you will not be processed
- Carry-forward of capital losses is forfeited if the original return deadline was July 31
What if you missed the 30-day e-verification window?
You can request condonation of delay by providing an appropriate reason. Only after submitting such a request and having it approved by the Income Tax Authority will your return be considered valid.
To file a condonation request — log in to the income tax portal → e-File → Condonation Request → Select “Allow ITR filing after time-barred” — provide a genuine reason and submit. If the department approves it, your late-verified return is treated as valid from the original filing date.
Approval is not guaranteed — the department evaluates each request. The safest approach is always to e-verify immediately after filing.
Frequently Asked Questions on ITR E-Verification
Is e-verify mandatory for ITR?
Yes — without e-verification your ITR is treated as invalid and not filed at all. No refund is processed, no carry-forward of losses is allowed, and non-filing consequences apply. E-verification is the final and mandatory step to complete your ITR filing.
How to do ITR e-verification online?
Log in to incometax.gov.in → e-File → Income Tax Returns → e-Verify Return → select your unverified return → choose a method (Aadhaar OTP is fastest) → complete verification. A Transaction ID is generated on successful e-verification.
What is the time limit for e-verification of ITR?
The time limit is 30 days from the date of filing the ITR. This rule applies to returns filed on or after August 1, 2022. Previously, the limit was 120 days. Always e-verify immediately after filing to avoid any risk of missing this window.
Is there a penalty for late e-verify?
If you miss the 30-day window, your return is treated as not filed — which attracts late filing penalty under Section 234F and interest under Section 234A on unpaid tax. You can file a condonation of delay request on the portal with a valid reason, but approval is at the department’s discretion. The safest approach is to e-verify the moment you submit your return.
What if I do not receive the Aadhaar OTP?
Check that your mobile number is the one currently registered with Aadhaar. If your Aadhaar-registered number has changed, update it at the nearest Aadhaar Seva Kendra. In the meantime, use the net banking method as an alternative — it does not require Aadhaar OTP.
Conclusion
E-verification is not just a formality — it is the step that actually activates your ITR in the system. Filing without e-verifying is like submitting an exam paper without writing your name on it. Use the Aadhaar OTP method for the fastest completion, and make it a habit to e-verify the same day you file. Your refund, your carry-forward losses, and your clean tax compliance record all depend on it.
Save Home Loan Interest Amount!
Use Home Loan Excel Calculator that will help you to Save Interest Amount on Home Loan EMI.
Click below button to download Home Loan EMI and Prepayment Calculator in Excel:
Watch how Home Loan Calculator in Excel Works
Income Tax Calculator App – FinCalC
For Income Tax Calculation on your mobile device, you can Download my Android App “FinCalC” which I have developed for you to make your income tax calculation easy.
What you can do with this mobile App?
- Calculate Income Tax for FY 2025-26 and previous FY 2024-25
- Enter estimated Investments to check income tax with Old and New Tax Regime
- Save income tax details and track regularly
- Know how much to invest more to save income tax
- More calculators including PPF, SIP returns, Savings account interest and lot more
Use Popular Calculators:
- Income Tax Calculator
- Home Loan EMI Calculator
- SIP Calculator
- PPF Calculator
- HRA Calculator
- Step up SIP Calculator
- Savings Account Interest Calculator
- Lump sum Calculator
- FD Calculator
- RD Calculator
- Car Loan EMI Calculator
- Bike Loan EMI Calculator
- Sukanya Samriddhi Calculator
- Provident Fund Calculator
- Senior Citizen Savings Calculator
- NSC Calculator
- Monthly Income Scheme Calculator
- Mahila Samman Savings Calculator
- Systematic Withdrawal Calculator
- CAGR Calculator
I’d love to hear from you if you have any queries about Personal Finance and Money Management.
JOIN Telegram Group and stay updated with latest Personal Finance News and Topics.
Download our Free Android App – FinCalC to Calculate Income Tax and Interest on various small Saving Schemes in India including PPF, NSC, SIP and lot more.
Follow the Blog and Subscribe to YouTube Channel to stay updated about Personal Finance and Money Management topics.
Disclaimer: Mutual Fund investments are subject to market risks, read all scheme related documents carefully. Registration granted by AMFI, membership of SIRO (if applicable), and certification from NISM in no way guarantee performance of the intermediary or provide any assurance of returns to investors.
Distributor Details: Name: Abhilash Gupta | AMFI Registered Mutual Fund Distributor | ARN: 367014